Repairs
This is a section I hoped I wouldn't have to create.
But with everything made and used by man
something is bound to break!
The Run away Tire!
Our firsts significant break down was on our second trip and our first
long trip to northern California. On our trip home on I-5 close to Lost
Hills, Ca. We felt a bump, like we went over a speed bump. I slowed
and looked in the rear view mirror and to my surprise I saw what I
thought was a tire from our trailer that had come off the rim and went
spinning off to the side and disappearing behind us. As I slowed we
then felt a 'Thump', like someone had rear-ended us! Then as we were
slowing and pulling to the shoulder, our the passenger window we saw
our trailer tire and wheel pass us on the grass shoulder of the freeway!
My first thought was that the lug nut had come off and the tire/wheel had
worked their way off the hub. After we got stopped a closer look revealed
ALL 5 wheel studs were sheared off!!

What happened to our tire? Wheel? OMG!
We through the tire and wheel in the back of the truck and limped along the should to the next off ramp. Of coarse it was about 4pm with nothing for miles! We found a quite street next to a Mobil Station and I was looking through my cellphone for a tire shop or an auto supply. We a pickup with two guys pulled up beside our truck and asked if we had a problem? Yes. They worked for a big rig tire shop, and said they would run to a Napa Auto Parts and get some studs and lug nuts so we could mount our spare. I suggested they take the drum, so the new studs could be pressed in it. They had NO tools and the only tools I had was an ax and a screw driver. With a good bit on luck, I got the cotter pin out and the axle nut off. They left and Robin and I wondered if we would ever see our drum again!

The 'Run-a-way' Tire and Wheel.
About an hour later the showed up with our drum and 5 shinny new studs and lug nuts! With their help I got the drum back on the hub and the spare tire mounted and we were back on the road to our campground reservation.
Back side!
Editorial Note:
We did an extended warranty dance with Lance Corp. through the dealership we purchased our trailer from, on the wheel. Lance was very quick to shove 3 or 4 pages from the owners manual in our face, admonishing their customers to check the TORQUE of the lug nuts every 20, 40 60 etc. miles on our trip. (I have NEVER in my 40+ years of owning and driving all kinds of vehicles, had to stop and re-torque lug nuts!) The best part of this story is that Lance failed to list on any of their pages the proper amount to torque the nuts too! I called our dealership and they told me 195 ft.lbs., I said are you sure? YES! Well feeling that this was a little high and the fact that my Torque Wrench didn't go that high I decided to contact a few tire shops in my area, and they all indicated for 1\2 inch studs the lug nuts should be torqued to 75-85 ft.lbs.
If you look close at the drum ALL of the studs were Sheered off at the drum and there was very little damage to the bolt holes in the wheel. The Road Service company that helped us out in the middle of nowhere said it looked like we had a sudden failure, not loose lug nuts. It's unusual for all 5 lug nut to come all the way off without some warning, like a wobbling wheel or something similar. If they did the studs wouldn't be broken off, bent maybe, but not sheered off. There are two strong possibilities; a very severe impact like a pot hole, or hitting an object in the road, but something that sever would have damaged the tire and wheel. Or, if the lugs were significantly over tightened to the point of metal fatigue! A check by the road service personnel found that the three remaining wheels lug nuts were a secure. I'll let you draw your own conclusion!
------------------------------------------------------------------------------------------------------------------------
The Tilting Slide and the Loose closet.
We had noticed from time to time that there was movement between our closet wall where it attaches to the outside wall. The indication of movement was the caulking in the seams would be broken. Over a period of a couple years or so I would re-caulk this seam as well as a couple others.
After our 2 month trip we noticed the caulk was broke and a significantly wider gap now existed. So a few weeks after we were home I decided to empty the closet to see if I could tighten the screws that secure the closet walls to the outside wall.
To my dismay the screws just turned and turned, so I tried to un-screw them.


This picture is of the back side of the bathroom sink pullman where it attaches to the outside wall.At this point I felt this and a couple other problem may need to be repaired by the Lance Service Center!
I made an appointment and took our 2285 in. I also show them a couple other problems that I wanted looked at while it was there.
First a gap between the box that covers the wheel under the couch. This gap has existed for some time and I'm not sure if it is getting worse or not.

 About a 1/2" gap go to 0" at the outside wall.
The last item of concern was with out slide. I had noticed, it appeared to be leaning toward the back of our trailer.
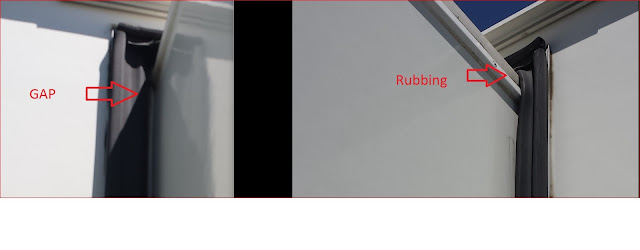 Here are a couple pictures I took before our big trip, that show the gap on the front end and the rubber seal being bent on the back end. I sent a email to Happijac before or trip and to date NO response!
After a couple weeks I received a call from the Lance Service Center. The information I received was a little shocking! I was quoted a cost $1400+/-! Now in all fairness with no explanation, I assumed this was to fix the closet!?! I personally felt this was exorbitant to re-screw the closet walls back to the out side wall! However at this point, I was told that Lance felt my problems were ALL caused by; "Rear bumper has a welded 3500 lb to the top of the bumper with support braces, trailer floor is bowed and distorted from additional load stress"! When I asked, what about the slide? I got the impression it hadn't even been evaluated and after short pause, the answer was $275.
I discussed this info with my DW and we felt that $1400 was out of line for such a minor repair, so I said, fix the slide and I'll take care of the rest. Then I was told my trailer would be ready in a couple days.
 Left side.
 Right side.
 This is a close-up of the right side after repair and if you compare it with the before above, you can see the rubber seal is 'less bend' then in the before picture. This is the reason for my statement of 'slightly better'! If you look at the seal along the bottom of the slide, it appears to be consistent with the bottom of the slide housing all the way across.
The Lance Tech indicated the repair to the slide, consisted of the installation of a piece of 1/4" Teflon material to the slide mechanism and the bottom of the slide.

This picture is of the rear most slide rail under the slide inside the trailer. The added Teflon material is a little hard to see, so the picture below is zoomed in picture.

Here zoomed in you can see the Teflon (black) between the bottom of the slide and the slide rail.
 This is the other (front) rail with NO Teflon.
After returning home, I had been mulling over a number of different way to re-secure the closet walls to the outer wall. The one I went with, was to use 'Forstner Bits" to simulate the Kreg Jig holes, similar to what Lance put in wall, to drill holes into the closet walls just deep enough to duplicate the angled holes Lance uses to insert screws into.
 Here are a series of pictures showing the various screws and fasteners I used. Lance used about 6 screws to fasten one closet wall to the outer wall from floor to ceiling. After I made a few of my screw holes, I decided to try and install new screws in the Lance holes, even though there still broken pieces in the wall. (I should note: I would have had to do a lot of removal of wiring and other thing to move the closet walls out enough to remove the broken pieces from the outside wall. Some I felt was a waste of time and energy and in the long run, I was able to work new screws into the old holes with very little effort.) I added approximately 6-8 additional screw to the original Lance 6.

Here you can see the Lance fasteners and the holes and screws I installed.

For a little over kill, I decided to add "Slotted Angle Iron" strips to each side. I noticed as I was installing the screws Lance provide a fairly wide attachment strips in the wall, so I got a good, tight feel with the screws I installed. I started with 1" screws for the outside wall and discovered (to late!!!) they were too long! So I get to do some gel coat repair also! 3/4" screws work much better.
 Here's a picture at the floor of the wall next to the bathroom pull-man.
 Here's a picture at the floor of the closet wall next to the couch. Notice the gap at the bottom of the wall, it's actually only about a 1/4", the pattern on the vinyl flooring makes it look wider.
This gap started me wondering, if I should have tried jacking the outside bottom edge of the up before I fastened the wall down. This is also close to the start of the wheel well. (More on this later)
The Finished Project

Here's the sink pull man after repairs. (before picture is above)
 Here's the covering plastic back in place, right side.
 Here's the covering plastic back in place, left side.
 Here's the finished repaired re-calked seam just above of the pull-man.


First a gap between the box that covers the wheel under the couch. This gap has existed for some time and I'm not sure if it is getting worse or not.


The last item of concern was with out slide. I had noticed, it appeared to be leaning toward the back of our trailer.

After a couple weeks I received a call from the Lance Service Center. The information I received was a little shocking! I was quoted a cost $1400+/-! Now in all fairness with no explanation, I assumed this was to fix the closet!?! I personally felt this was exorbitant to re-screw the closet walls back to the out side wall! However at this point, I was told that Lance felt my problems were ALL caused by; "Rear bumper has a welded 3500 lb to the top of the bumper with support braces, trailer floor is bowed and distorted from additional load stress"! When I asked, what about the slide? I got the impression it hadn't even been evaluated and after short pause, the answer was $275.
I discussed this info with my DW and we felt that $1400 was out of line for such a minor repair, so I said, fix the slide and I'll take care of the rest. Then I was told my trailer would be ready in a couple days.
The Slide after repairs.
When I arrived to pickup our trailer I looked at the slide, both open and closed and it appeared to be slightly better and I was assured "it was level and the opening in the side of the trailer, but the opening might be slightly our of square!" (Editorial Note: Lance can't make this giant hole in the side of their trailers SQUARE???)


The Lance Tech indicated the repair to the slide, consisted of the installation of a piece of 1/4" Teflon material to the slide mechanism and the bottom of the slide.

This picture is of the rear most slide rail under the slide inside the trailer. The added Teflon material is a little hard to see, so the picture below is zoomed in picture.

Here zoomed in you can see the Teflon (black) between the bottom of the slide and the slide rail.

Time will tell, I am satisfied for now.
--------------The closet repair.
Upon entering our trailer at the Lance Service Center the service tech noted how much less the gap was between the closet wall and outside wall and the gap at the back of the sink pull-man was much less! I thought, that strange, they didn't repair the closet, but everything was closer together, should make pulling everything back together much simpler.After returning home, I had been mulling over a number of different way to re-secure the closet walls to the outer wall. The one I went with, was to use 'Forstner Bits" to simulate the Kreg Jig holes, similar to what Lance put in wall, to drill holes into the closet walls just deep enough to duplicate the angled holes Lance uses to insert screws into.


Here you can see the Lance fasteners and the holes and screws I installed.

For a little over kill, I decided to add "Slotted Angle Iron" strips to each side. I noticed as I was installing the screws Lance provide a fairly wide attachment strips in the wall, so I got a good, tight feel with the screws I installed. I started with 1" screws for the outside wall and discovered (to late!!!) they were too long! So I get to do some gel coat repair also! 3/4" screws work much better.


This gap started me wondering, if I should have tried jacking the outside bottom edge of the up before I fastened the wall down. This is also close to the start of the wheel well. (More on this later)
The Finished Project

Here's the sink pull man after repairs. (before picture is above)


Same re-caulked seam next to the medicine cabinet. I am very pleased at how well the repair went. I hope with all the extra screws and slotted angle iron the walls will prevent future separation!!
A few days after completing the closet wall repair I was outside our trailer and had a reoccurring memory of the closet wall that appeared to be drooping. I decided to see how many 'Outriggers" there were under the wall that seemed to be drooping. Here's what I noticed.

This is the outrigger between the front steps and the front of the trailer.
If you look closely you see a 2"x 2" square piece of the very same Teflon used under the slide rail, noted above. After seeing this and knowing it had to be a recent addition, I walked around our trailer and found these pieces had been added at the exact same spot on ALL outriggers and cross members! My Engineering background tells me, Lance came to the same concussing I did. The wall were drooping and the 1/4" Teflon pads were their way of raising the walls. The cause of the drooping could be speculated on forever. Lance told me it was because of my bummer and bike rack. My opinion is, the bike rack is at the very back of the trailer, the wall drooping is in front of the axles, in an area were the BAL frame is extra strong, because of the axles and any vibration or wave action caused by the bikes bouncing Would Not and could not effect the walls in front of the axles. Any deformation from the bikes would be limited to the back half of the trailer and there has been NO separations or failures of any kind in that area. All cabinets still are as tight and square as they were when the trailer was built.

My opinion as to the cause of the closet separation and the wheel cover gap is due to the weight of the roof (and equipment on it) along with the accumulated weight of walls that is transferred down to the outer edges of the floor. With the trailer frame inboard from the walls the only way for this weight to be supported is through the outriggers. If there are not enough outriggers and/or cross member to adequately support this weight, the walls will and did sag, especially in the wheel-well area . On our 2010 2285 there are NO outriggers on either side of the tires and first one in front of the tires is 4' away, just a short distance from the front steps. The total distance from outrigger to outrigger is 10'. This means there's nothing in between these two to support the weight of the roof and wall and especially where the tires are and where all the bumps in the road beat on the weight of the trailer.
At this point, if my suppositions are correct, the closet walls screws were sheared, because those 12 screws in the closet walls were carrying the weight of the outside wall.
With respect to the wheel well cover noted earlier. I feel if there is some wall/floor dropping in the wheel well area, it might be the cause of this displacement. My temporary fix was to add some pieces of trim to the gap area to reduce dust from coming in until a permanent correction is found.
My solution will be to fabricate 6 more outriggers/cross-members to fit in between the existing ones and for in front and behind the wheel wells.
To Be Continued!
No comments:
Post a Comment